https://v3.vuejs.org/guide/instance.html#creating-an-application-instance
위의 주소에서 자세한 vue3 문법을 확인할 수 있습니다.
인스턴스와 라이프사이클
<template>
  <h1>{{ count }}</h1>
</template>

<script>
export default {
  data() {
    return {
      count :2
    }
  },  //순서대로 실행된다.
  //거의 사용 X
  beforeCreate() {                            // 정의 되기전에 실행되기 때문에 데이터가 없어서 undefined
    console.log('Before Create!',this.count) // Before Create! undefined
  },
  //가장 많이 사용
  created() {
    console.log('Created!',this.count)      //Created! 2 생선된 직후라 2가 잘 출력
    console.log(document.querySelector('h1'))  //null 컴포넌트가 생성된 직후기 때문에 html 연결되기 전이다.
  },
  //활용도 떨어짐
  beforeMount() {
    console.log('Before Mount!')           //Before Mount!
    console.log(document.querySelector('h1'))   //null html과 연결이 되기전이기 때문에
  },//created, mounted 라이프사이클훅을 많이 사용
   mounted() {
    console.log('Mounted!')                //Mounted!
    console.log(document.querySelector('h1'))       //<h1>2</h1>
  },
}
</script>
app.vue에 작성한 코드이며 주석으로 상세한 설명을 적어두었습니다!
created와 mounted 라이프사이클 훅의 개념 정도만 알아두면 된다.
템플릿 문법
<template>
  <h1
    v-once
    @click="add">
    {{ msg }}
  </h1>       <!-- v-once 화면에 한번 출력되면 데이터와 상관없이 화면 갱신하지 않는다. -->
</template>

<script>
export default {
  data() {
    return {
      msg:'hello world!'
    }
  },
  methods : {
    add() {
      this.msg +='!'
    }
  }
}
</script>
v-once는 처음 화면에 출력되면 출력 값을 갱신하지 않습니다.
@click="add"로 설정이 되어 있어서 클릭시 add 함수가 실행되어 msg 뒤에! 가 붙는 구조인데 v-once 때문에 변경되지 않습니다.
원시 HTML
<template>
  <h1
    v-once
    @click="add">
    {{ msg }}
  </h1>       <!-- v-once 화면에 한번 출력되면 데이터와 상관없이 화면 갱신하지 않는다. -->
  <h1 v-html="msg"></h1>  <!-- 실제  html 이 잘 동작한다. -->
</template>

<script>
export default {
  data() {
    return {
      msg:'<div style="color:red;">Hello!!!</div>'
    }
  },
  methods : {
    add() {
      this.msg +='!'
    }
  }
}
</script>
vue.app 에 이렇게 작성해주면
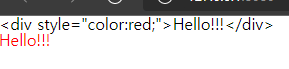
이러한 결과로 html 코드가 잘 출력되는 걸 확인할 수 있다.
속성
<template>
  <h1 :class="msg">
    <!-- v-bind를 이용해서  html 속성을 이용할 수 있다.-->
    <!-- 약어를 사용하면 앞에 v-bind가 사라진다. -->
    {{ msg }}
  </h1>
</template>

<script>
export default {
  data() {
    return {
      msg:'active'
    }
  },
  methods : {
    add() {
      this.msg +='!'
    }
  }
}
</script>

<style scoped>
.active {
  color:royalblue;
  font-size:100px;
}
</style>
v-bind를 이용해 속성을 설정할 수 있다.
v-on 약어
<a v-on:click="doSomething"> ... </a> //전체 문법
<a @click="doSomething"> ... </a> //약어
<a @[event]="doSomething"> ... </a> //동적 전달 인자와 함께 쓴 약어
동적 전달인자
<template>
  <h1
    :[attr]="'active'"
    @[event]="add">
    <!-- attr에는 class라는 문자가 들어가게 된다. -->
    <!-- event는 click이 된다. -->
    <!-- v-bind를 이용해서  html 속성을 이용할 수 있다.-->
    <!-- 약어를 사용하면 앞에 v-bind가 사라진다. -->
    {{ msg }}
  </h1>
</template>

<script>
export default {
  data() {
    return {
      msg:'active',
      attr:'class',
      event:'click'
    }
  },
  methods : {
    add() {
      this.msg +='!'
    }
  }
}
</script>

<style scoped>
.active {
  color:royalblue;
  font-size:100px;
}
</style>
'vue.js' 카테고리의 다른 글
| vue3 문법[클래스와 스타일 바인딩, 조건부 렌더링, 리스트 렌더링] (0) | 2021.11.07 |
|---|---|
| vue3 문법[computed,Getter,Setter,Watch] (0) | 2021.11.06 |
| veu.js[webpack]_3 (0) | 2021.11.05 |
| vue.js [Webpack]_2 (0) | 2021.11.03 |
| vue.js[webpack]_1 (0) | 2021.11.03 |